
GEWU DOCUMENTATION
GW-VC-A Intelligent Irrigation Valve
It integrates remote communication, solar power supply, precise pressure regulation and automatic control. Supporting 4G/LoRa communication, it can be remotely operated via WeChat mini‑program to realize zoned irrigation, timing control and fine water management.
What should I know about GW-VC-A Intelligent Irrigation Valve?
It integrates remote communication, solar power supply, precise pressure regulation and automatic control. Supporting 4G/LoRa communication, it can be remotely operated via WeChat mini‑program to realize zoned irrigation, timing control and fine water management.
Hardware Section
Product Overview
This valve body adopts reinforced‑nylon main body with full‑metal gears, delivering excellent high‑low temperature resistance and durability.
- 4G nationwide cellular communication; no extra base station or gateway equipment required. Operate by scanning QR‑code with mobile phone, ready‑to‑use out‑of‑box with no hidden fees.
- Powered by combination of standard 21700 flat‑top lithium‑ion battery and solar panel to guarantee long‑term runtime.
- Supports multiple emergency opening/closing methods including on‑site push‑buttons and manual wrench to flexibly handle unexpected failures.
- Quick‑detachable full‑unit structure greatly reduces later‑stage maintenance workload.
Technical Specifications
| Item | Parameter |
|---|---|
| Power Supply | 21700 flat‑top lithium‑ion battery, solar panel |
| Communication | 4G nationwide cellular network |
| Data Service Fee | Free for 3 years (counted from first device activation) |
| Inlet Size | 4 inch / DN110 |
| Outlet Size | Three‑way valve ZDS‑3L: dual outlets; Two‑way valve ZDB‑2: 3 inch / DN90 |
| Valve‑body Material | Reinforced nylon |
| Ambient Operating Temperature | ‑20 ℃ ~ 90 ℃ |
| Working Pressure | 0‑5 kg/cm² |
Structure & Operation Panel
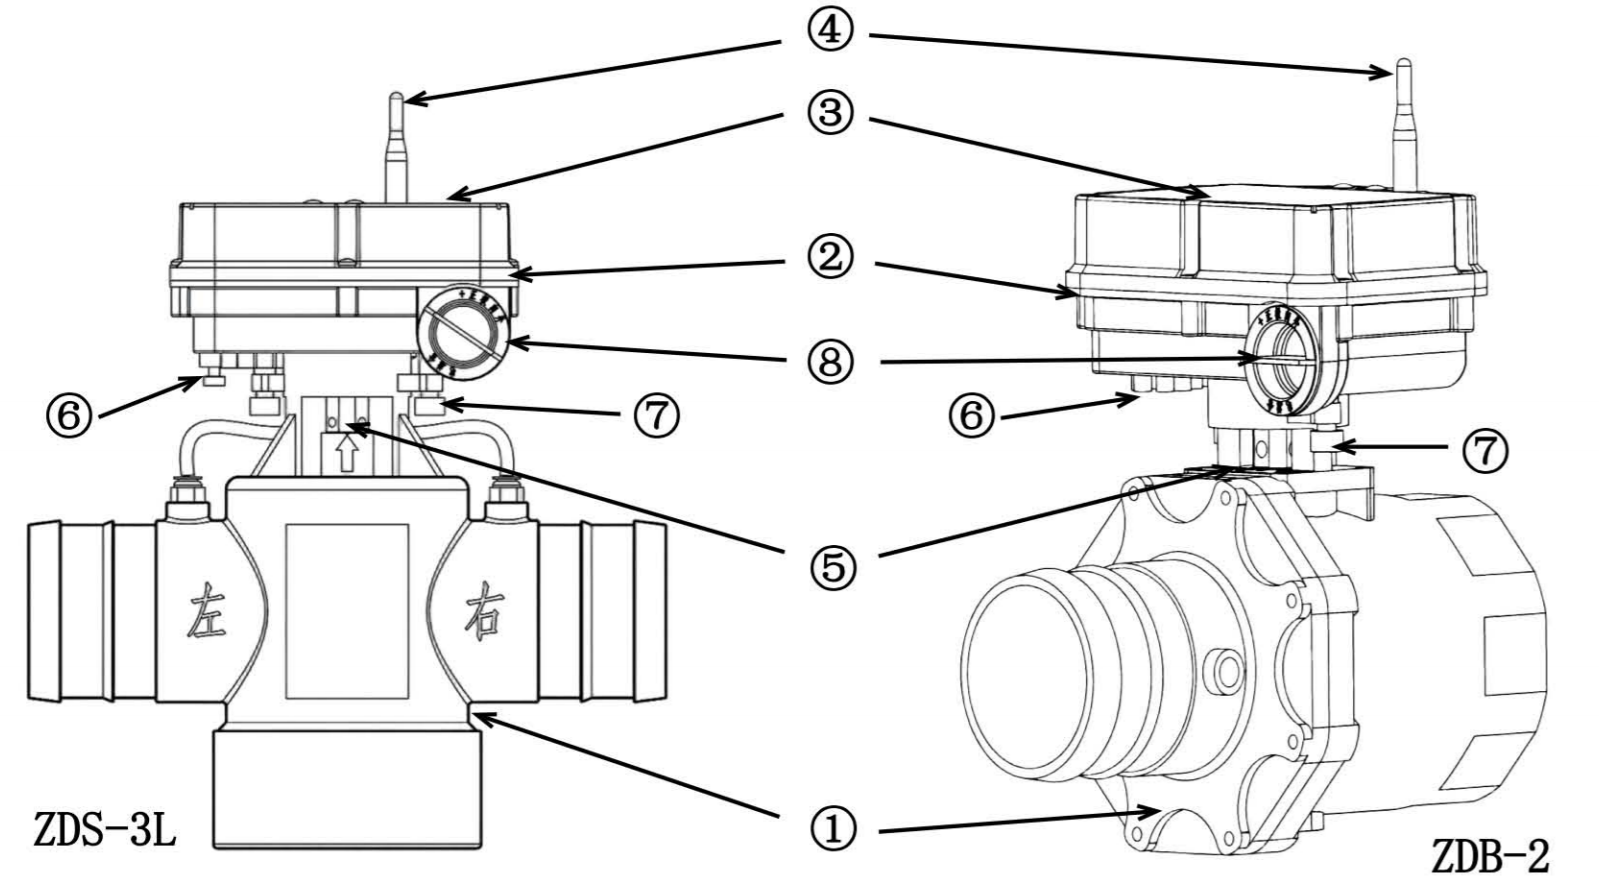
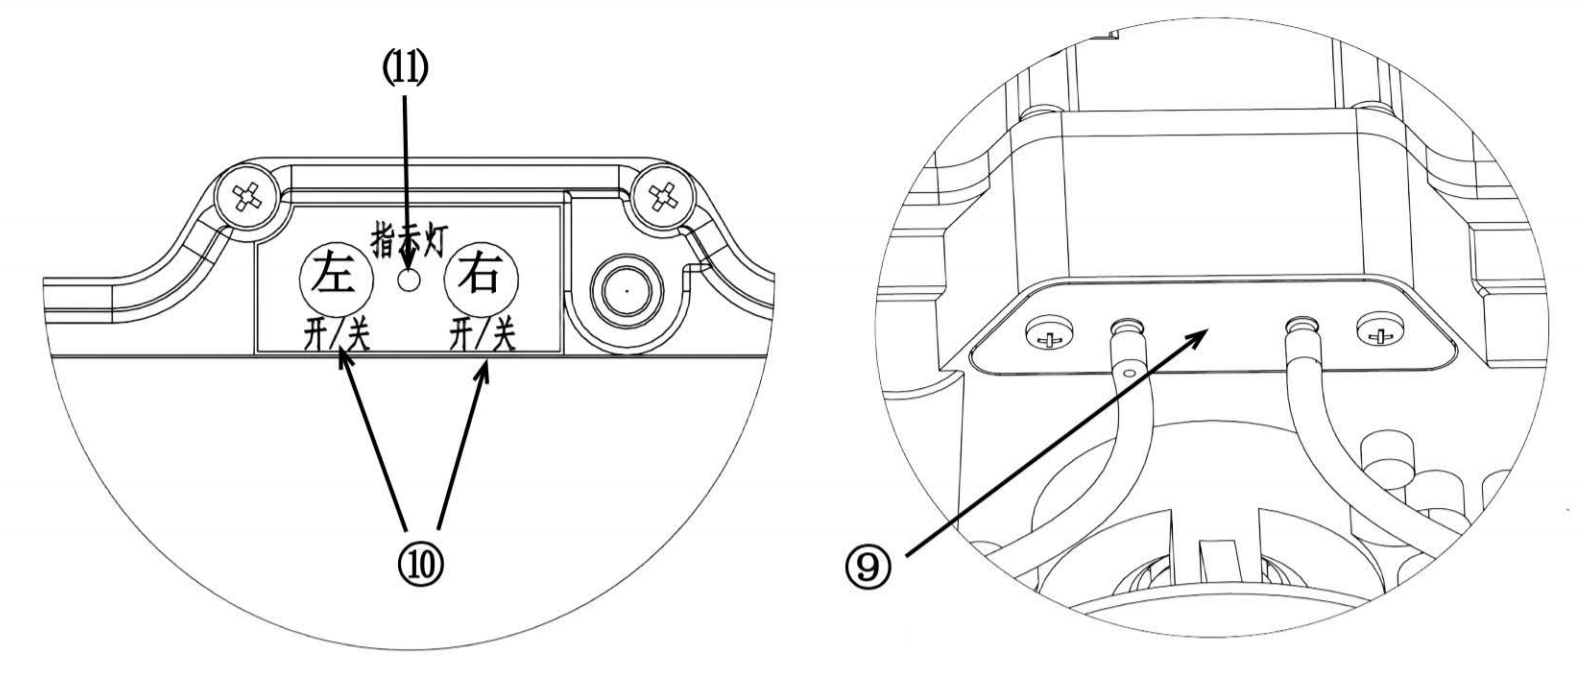
Drawing Legend 1 Valve‑body Assembly 2 Actuator Assembly 3 Solar Panel 4 Antenna 5 Valve‑position Indicator / Drive Shaft 6 Clutch Button 7 Hand‑Tightening Screw 8 Battery Compartment 9 Pressure‑Sensor Assembly ⑩ Valve On‑Off Button ⑪ Indicator LED
Operating Instructions
1. Battery Installation & Replacement
- Unscrew the battery‑compartment cover counter‑clockwise.
- Lift the outer positive‑contact metal spring. Insert battery into compartment with negative terminal inward, positive terminal outward.
- Lower the positive‑contact spring back, tighten compartment cover clockwise; the device powers‑on.
Battery Removal: Lift outer positive‑contact spring with one hand; push battery inward to compress negative‑terminal spring with the other hand and release quickly. The battery will pop outward for easy removal.
⚠️ Special power‑off replacement procedure (battery fully drained / device offline): Fully cover the solar panel before replacement. Remove old battery, wait 30 seconds, then install new battery. Remove solar‑panel shielding after installation completes. Note: The device is supplied with a high‑power solar charging panel. Under sufficient sunlight and fault‑free hardware conditions, battery exhaustion shall not occur.
2. Antenna Installation
Remove dust cap from antenna base; screw supplied antenna clockwise onto antenna base.
⚠️ Do not remove dust cap if antenna will not be fitted, to prevent water ingress damaging antenna base and mainboard.
3. Manual Button Valve Operation (Battery charged)
Operate via buttons on actuator panel:
- ZDS‑3L (Three‑way Valve): Short‑press button to open valve; long‑press to close valve. 【LEFT】button controls left‑side outlet; 【RIGHT】button controls right‑side outlet.
- ZDB‑2 (Two‑way Valve): Only use 【RIGHT】button for valve open‑close control.
4. Emergency Valve Operation
Method 1 (Clutch‑knob Operation) Pinch and pull clutch button upward. Insert screwdriver or similar tool into drive‑shaft hole, rotate drive shaft to target valve position, then release clutch button.
Method 2 (Actuator‑lift Operation) Unscrew two actuator hand‑tightening screws, lift actuator upward approx. 5 mm. Manually rotate actuator to adjust valve position. After positioning, depress clutch button, press actuator back into place and retighten hand‑tightening screws.
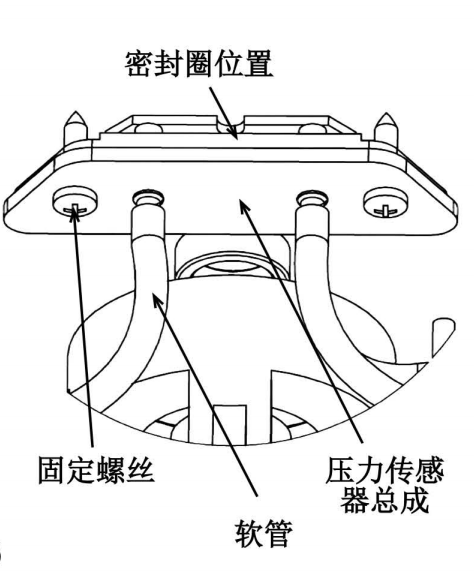
5. Pressure‑Sensor Installation & Replacement
- Disconnect pressure‑sensor connecting hose.
- Unscrew hand‑tightening screws and remove actuator assembly.
- Unscrew two pressure‑sensor fixing screws counter‑clockwise, take out sensor assembly and unplug sensor cable connector.
- Reconnect cable to new sensor, reassemble in reverse order of disassembly.
Make sure sealing gasket is not omitted during installation. Follow identical steps for adding a new pressure‑sensor if unit was delivered without one.
6. LED Indicator Status
The LED indicates power‑supply and network operating status.
Fault Diagnosis & Troubleshooting
| Fault Phenomenon | Root Cause | Remedy | Remarks |
|---|---|---|---|
| Low‑battery alarm | Solar‑panel is shaded | Clear obstructions | Check installation orientation |
| Solar‑panel hardware failure | Contact manufacturer after‑sales support | ||
| Valve fails manual / remote actuation | Clutch assembly detached or damaged | Repair clutch components | |
| Device offline | Data service expired | Contact manufacturer for renewal | Properly‑working unit shall not exhaust traffic unexpectedly |
| Poor cellular signal | Adjust antenna mounting location | ||
| Abnormal pressure readings | Hose detached or ruptured | Repair / replace hose assembly | |
| Seal components worn | Replace seals using repair kit |
Maintenance & Winter‑Season Precautions
1. Complete Restart Procedure After Full Battery Drain
Must execute this procedure after deep battery depletion, otherwise device may fail to go online:
- Fully cover solar‑panel before battery replacement.
- Remove old battery, wait 30 seconds then fit new battery.
- Remove solar‑panel shielding. If LED stays off, press any button to wake‑up device.
For first‑time battery installation under bright outdoor sunlight, cover solar‑panel prior to battery fitting as best practice.
2. Daily‑use Guidelines
- Provide physical protection during farm machinery field‑work to avoid impact‑caused damage.
- If battery level keeps dropping despite consecutive sunny days, inspect for solar‑panel obstructions.
- Investigate and resolve fault alarms promptly to avoid secondary losses.
3. Winter Freeze‑Protection Storage
- When irrigation season ends: preferably retrieve the whole unit indoors. Remove battery and antenna. Store battery at full charge to prevent capacity degradation from long‑term idle storage.
- For units unable to be retrieved: open valves before winter to fully drain residual pipeline water and prevent valve‑body cracking by freezing.
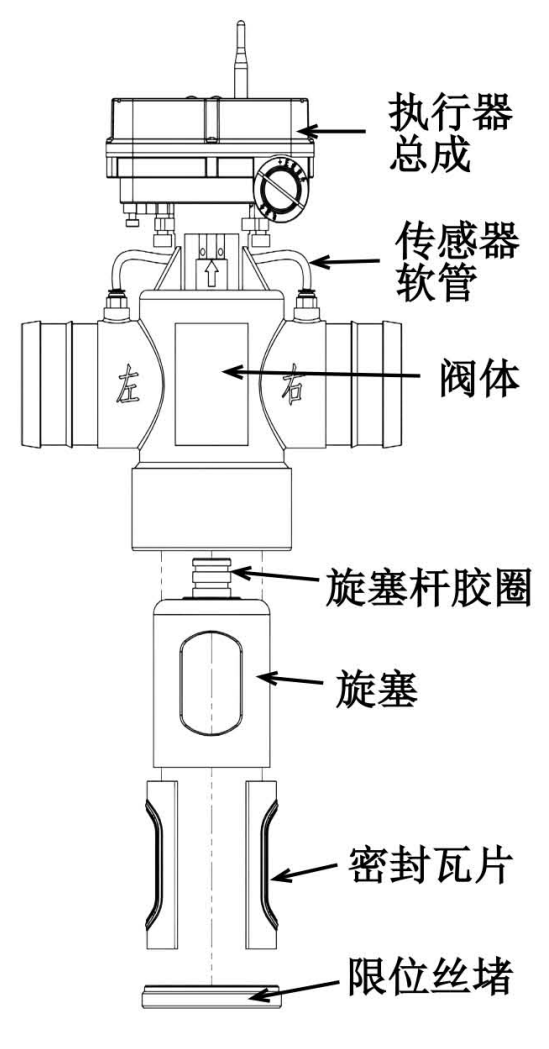
4. Seal‑Replacement Steps
- Disconnect valve from pipeline outlet. Remove hand‑tightening screws, disconnect pressure‑sensor hose, separate actuator from valve‑body.
- Invert valve body, unscrew limit plug counter‑clockwise, extract plug‑cock and sealing tiles.
- Replace plug‑cock O‑ring and sealing tiles, reassemble in reverse disassembly order.
If plug‑cock sticks hard during removal, tap gently with soft wooden tool. Do NOT strike forcefully with hard metal tools.
Software Section
Mini‑Program Registration & Usage
Search for corresponding WeChat Mini‑Program, register and log‑in account. Users can create field plots, bind devices and perform remote valve control.
Full Mini‑Program tutorial: Scan product QR‑code or follow official link for detailed documentation.
After‑sales Terms & Disclaimer
- Warranty Coverage: All hardware components sold by our company.
- Warranty Period: 12 months from purchase date.
- Free repair or replacement is offered for quality‑caused failures within warranty period. Repair / component‑replacement fees apply for out‑of‑warranty units.
After‑sales channel: Prioritize contacting local distributor. If no local distributor exists, send unit back to factory for inspection. For confirmed in‑warranty quality defects, manufacturer covers round‑trip shipping fees. On‑site field service is NOT provided.
- Device includes 3‑year free cellular‑data service, effective from first‑time device activation.
- Costs for failures induced by man‑made damage or external environmental conditions shall be borne by end‑user.
- Our company assumes only limited liability within defined warranty scope. No consequential or indirect liability will be accepted for ambiguous damage claims.